Hi folks and welcome to Adiga Armory! In this video, I wanted to talk to you about hand loading your own custom, precision, long-range rifle ammo. If there only one thing you take away from all of this, it is that the key to accuracy is consistency, and the key to consistency is to remove as many variables as possible.
Just remember, none of this stuff will help if your barrel is all fouled up. So, please remember to check out our citrus-powered synthetic CLP.
Just a little background on my perspective… I am a 42 year old US Army veteran who has been teaching shooting in both military and civilian environments since 2013. I grew up learning marksmanship, hunting and mountaineering in the beautiful Rocky Mountains, and have been involved in custom gun work and hand loading for over two decades now.
That said, I don’t ever want to imply that my way is the “right” way or the only way to do things. All I want to do is show you what I have found that works for me, and hopefully save you some trial, error and money as you get yourself up to speed with precision rifle loads.
GEAR
Now, let’s talk about gear for a few. Just so you know, we have no affiliation with any of the manufacturers or distributors of these products, and we don’t sell any of this stuff. This is just some of the gear I use personally. There’s definitely a lot of gear options out there, so feel free to shop around for what best suits you.
Let’s start off by talking about the foundational hand loading tool… the press. For precision rifle loads, I tend to prefer a solid, single-stage press like this Lee Breech Lock Challenger Press. It has a full wrap frame so there is no flex, it’s easy to swap the dies, and most importantly, it is very consistent. In general, automated or progressive presses don’t seem to yield the level of consistency that you get from an old-school, basic single-stage press under the arm of a methodical, OCD hand load nut job like yours truly.
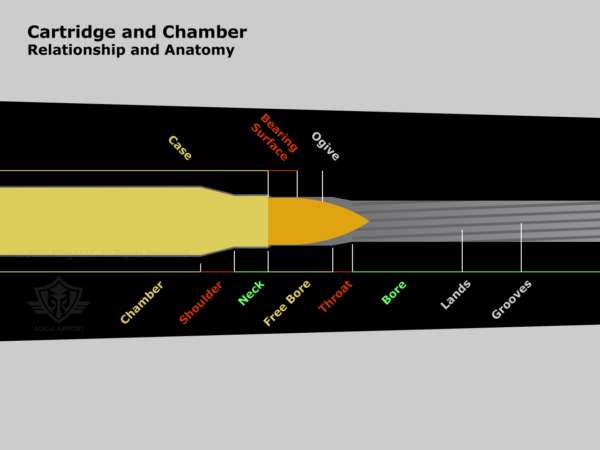
Another valuable tool is the Hornady Lock-n-Load OAL gauge. The less time a bullet spends “jumping” through the “free bore” and into the throat and ultimately into the lands and grooves of the barrel rifling, the more accurate it will be. This tool will help you to determine the optimal overall length of your custom load by gauging the true distance to the lands of your specific barrel. This custom OAL can be a bit longer than conventional load specs… but let’s be honest folks, who wouldn’t appreciate just a little more length, right?
One little word of warning on this is that your custom OAL might be significantly longer than the SAAMI cartridge specs call for. This can cause serious issues with magazine fed rifles, particularly auto-loaders, as the cartridge may become too long to fit in the mag or may bind during feeding. If that’s the case, you may have some trial and error in finding the longest OAL that will still fit in your mag and feed reliably. For auto-loading precision rifles, I generally like to load precision rounds no longer than the max SAAMI cartridge overall length to ensure proper function, and simply adjust the powder charge slightly if the original load called for a shorter OAL.
Next up, you will want a quality scale that measures down to at least 1/10 of a grain. I wouldn’t go too cheap on this tool, as your load consistency will pay the price. Make sure you have some good calibration weights to calibrate every time you use it, and remember to check the calibration regularly throughout the loading session. That said, I have had good results with this decade-old RCBS Rangemaster 750. It seems to be very precise, despite the occasional firmware quirks. A good analog scale would also serve you very well.
Another handy item is a powder trickler like this Redding Model 5. This will allow you to add powder to the scale one kernel at a time. It works particularly well with large-kernel rifle powders, and is essential to getting that powder charge just right.
Despite being a bit of a tech junkie, I don’t tend to trust electronics. I don’t like all of the electronic crap they put in my truck… especially in the drive train and power train. That’s probably why I like using an analog caliper like this Tekton for precision loading. Aside from having kind of a cool, retro vibe, I tend to trust it a bit more than a cheap-o digital caliper because it relies primarily on a hard mechanical connection with teeth and gears as opposed to electronic sensors. It’s probably just my own perception, and may not be based in reality at all. But what the heck, everything is all about feelings nowadays, and this just feels more trustworthy to me.
Another critical tool is your crimping die. I’ve been using the Lee Factory Crimp die for many years with great success. A good case crimp is essential for guaranteeing a uniform starting pressure, as it holds the bullet in place for longer and allows the pressure to build up a bit before it begins it journey. This leads to a more complete and efficient powder burn, and further reduces inconsistencies in muzzle velocity.
For bolt actions and single shot rifles, I only apply a light crimp… maybe ¼-½ the depth of the full crimp. This relieves stress on the case neck and causes less deformation to the bearing surface of a bullet that lacks a cannelure. For auto-loaders I usually do a full crimp to avoid having any bullet setback when it slams against the feed ramp during feeding.
Another item you’ll want to get if you haven’t already is a decent set of manual case prep tools. Some reloading kits come with little fingerling-sized deburring and primer pocket tools, but using them gets old really fast. If you have a lot of case prep to do, you quickly get tired and lazy, which leads to cut corners and poor consistency. Lyman makes a variety of nice prep tools that will help make things easier on your hands. On the other side of that, using motorized prep machines requires extra care of its own, in that you don’t go overboard while deburring the case neck. Remember, it only needs a tiny chamfer inside and outside the neck to do the trick.
CASE PREP
Let’s talk about brass a minute. When you’re choosing brass, you basically have two broad choices: Option 1] you can spend gobs of cash on high-end, premium cases that offer the maximum geometric uniformity and metallurgical consistency. If you can float the bill for this, there’s definitely some nice options out there. Or, option 2] you can use standard cases like this Winchester brass, and you can simply sort them for uniformity yourself. A simple way to get consistent cases is to first do all of your cleaning, sizing and trimming, then go through and weigh 10 of your cases one at a time to get an average case weight. Once you get an average weight, you can then weigh all the cases individually and remove the ones that are grossly over or under weight… just set those aside for less critical applications.
You’ll also want to remove any damaged or malformed cases, or those with odd-shaped primer flash holes through a careful visual inspection. Out of this 500 piece lot of .308 cases, I ended up with about 300 that were adequately suited for precision loads, which is not bad considering the affordable price.
One little side note on cases… I’m not a big fan of reusing NATO head stamped cases for precision .308 loads for two reasons: 1] they have a crimped primer, meaning you have to ream out the primer pocket prior to priming, [try saying that 3 times really fast: primer pocket prior to priming… let me just clean the spit off the mic]… and 2] they tend to have thicker, more rigid brass that is harder to resize and seems to have a bit less case volume than commercial .308. In other words, some standard .308 powder charges can become compressed loads in 7.62 NATO brass.
Moving on… When using brand new cases, I like to first run a full-length sizer and fireform them in the specific rifle I am loading for. Fireforming is simply loading and firing them in your rifle one time so that the case forms to the chamber under the pressure of firing. After they’ve been fireformed, I will only use those cases for that specific rifle, and I only use the neck sizing die from that point on. Neck sizing is a lot less stressful on the cases without the need for annealing [or heat treating] the neck, and will result in a longer case life compared to full-length sizing every time. Also, fireformed, neck-sized brass tends to be more conducive to precision accuracy than full-length sizing due to the tighter initial fitting in the chamber. That said, if you are using an auto-loader, full-length sizing is a safer bet to ensure good reliability.
BULLETS
Now, let’s talk bullets for few. Bullet designs have gotten pretty evolved over the years. In just a few decades we went from very basic soft or hollow points, to having electronically bonded cores with colorful polymer ballistic tips and even high-tech bullet coatings built right in. One of my favorite big game bullets is the Nosler Accubond, and it has most of these bells and whistles. It is an excellent bullet by any standard, and has served me very well on numerous hunts. I have also tried a litany of other modern ballistic tip bullets from the likes of Hornady, Winchester, Nosler, etc…
After spending more than a decade in ballistic tip world, I found myself drawn back to a cult classic… no other than the legendary Sierra Matchking hollow point boat tail. The Matchking #2275 is a 175g .308 bullet that has been the go to bullet for both long range competitive shooters as well as professional military snipers for a very long time, and for good reason… complete and utter consistency.
This bullet is just boringly-predictable. And while the curse of boring-predictability has been plaguing Hollywood movies since the Chinese government bought up all the big studios, it is actually a good thing when it comes to bullets. We want to know exactly what will happen next; with no surprises, twists or turns in the plot.
As with the brass, I like to weigh my bullets for consistency, and I’ve noticed that the MatchKing weight variance from one bullet to another is virtually nonexistent. Furthermore, the dimensional aspects of the MatchKing, such as the arc of the ogive [that’s the forward facing “shoulders” of the bullet] tend to be more uniform, resulting in more consistent bullet seating, OAL and of course ballistic coefficients while it’s in flight.
Yeah, some of the fancy ballistic tip stuff looks better on paper, with higher ballistic coefficients and impressive terminal ballistics, but from what I’ve seen, it’s not all rainbows and unicorns. They have some potential downsides when it comes to long-range precision shooting that you should be aware of.
First and foremost is the factor of tip deformation that’s caused by supersonic friction. If you have not heard about this, I’d recommend you read up on the saga of the Hornady A-Max. Somehow, it was discovered [maybe by Mighty Mouse flying next to and A-Max in flight] that the A-Max tip was melting and deforming during flight. As a long-time user of the A-Max, I was actually a bit relieved to hear this news, as I always wondered how I could produce sub-MOA groups at 100 yards, but it all went to Hades out past 500-600, even on a calm day shooting off a Led Sled. It made sense that if the tip melted in flight that the farther it flew, the more unstable the bullet became.
Now, I applaud Hornady for coming out and admitting to this publicly, as well as taking steps to reformulate the poly tip and remedy the situation. They do appear to be a company that operates under principles of integrity. However, it still left me to wonder, what other bullet tips are melting in flight that we don’t know about?
The next area of concern is the weight consistency. As I mentioned before, I weigh each bullet and remove the outliers for serious precision loads. What I have found is that I have to discard a lot more poly tip bullets than other standard designs like the MatchKing due to them having a much wider extreme spread in weight as well as occasional visible inconsistencies in the tip.
The bottom line is that I now reserve my poly tip bullets for applications like big game hunting, in which I have a larger target at much closer ranges.
POWDER
Let’s move on to powder. Now, I don’t want to get too caught up in what the “best” powder is because it can vary greatly from one rifle and cartridge combination to another. One thing I can say is don’t assume that a powder that produces the highest velocities will necessarily be the best for precision, long-range shooting. That’s the case with my .300 Wby Mag powder of choice, IMR 4350. It is at least 150 fps slower than I can get with others, but it is very accurate in my rifle. And I’ll take an accuracy increase over a power increase any day of the week, especially when dealing with centerfire rifles that hit hard either way.
When choosing a powder, it is good to start with one that produces a good case fill with your chosen cartridge and bullet weight, and then work your way up to a charge weight that yields the best accuracy.
I usually start about mid-way between the starting and max load of a published load. For load development, I’ll load 5-rounds of each charge weight, moving up in ½ grain increments to the max load. Then I’ll shoot those 5-round groups of each charge weight in a cold barrel to see which one produces the best group.
One thing I have noticed over time is that running charge weights that are too extreme, either too mild or too hot, will negatively affect accuracy. On the low end, you have to get enough powder in there to reach the cartridge’s proper operating pressure, and in-turn, have consistent starting pressure, peak pressure and average pressure that produces consistent muzzle velocities.
Conversely, running loads that are too hot can also have negative effects on both accuracy and on barrel and brass longevity. So, take your time and try to find the sweet spot that your rifle likes best.
When weighing powder charges on my scale, I like to start a tenth or two underweight and use the powder trickler to slowly work my way up until the scale just tips to my desired weight. I find this method delivers a more consistent powder charge than going over weight and scooping kernels out until I get down to my weight. As a basic rule of thumb, I generally avoid volume-based charge measuring, like these scoops or the auto-disk charger for precision loads. Loading by weight seems to be the way to go if you have a quality scale.
PRIMERS:
Now let’s talk about primers. Primers are pretty straightforward, and aside from making sure your primer pockets and flash holes are clean, there are only a couple of added precautions for you to take. The first and most obvious is to buy premium, match-grade primers if possible. They’re not that much more money, and they tend to be a little bit more consistent.
Beyond that, you can also weigh your primers, come up with an average, and remove the extreme outliers as we did with the bullets and the brass.
And one final precaution with primers; don’t seat them too hard and deep. Primers prefer a gentile, nurturing… one might even say caring touch. If you ram it in there like an over-zealous bull on a first date with a pretty young heifer, you might pre-compress or displace some of the priming compound, which could result in slight ignition variances… again affecting operating pressures and ultimately increasing the extreme spread of your muzzle velocities.
CLOSURE:
Remember, everything we are doing is to try and shave off tiny bits of each variable to make everything as uniform as possible. So, even though it might seem like too small of a variable to even matter, it is the sum of all parts that come together and give you better consistency and improved, long-range accuracy.